How to Add Heatmaps to Your Shopify Store

Your store analytics tell you how many shoppers left a product page. They don't tell you what those shoppers clicked, how far they scrolled or which part of the page they never saw.
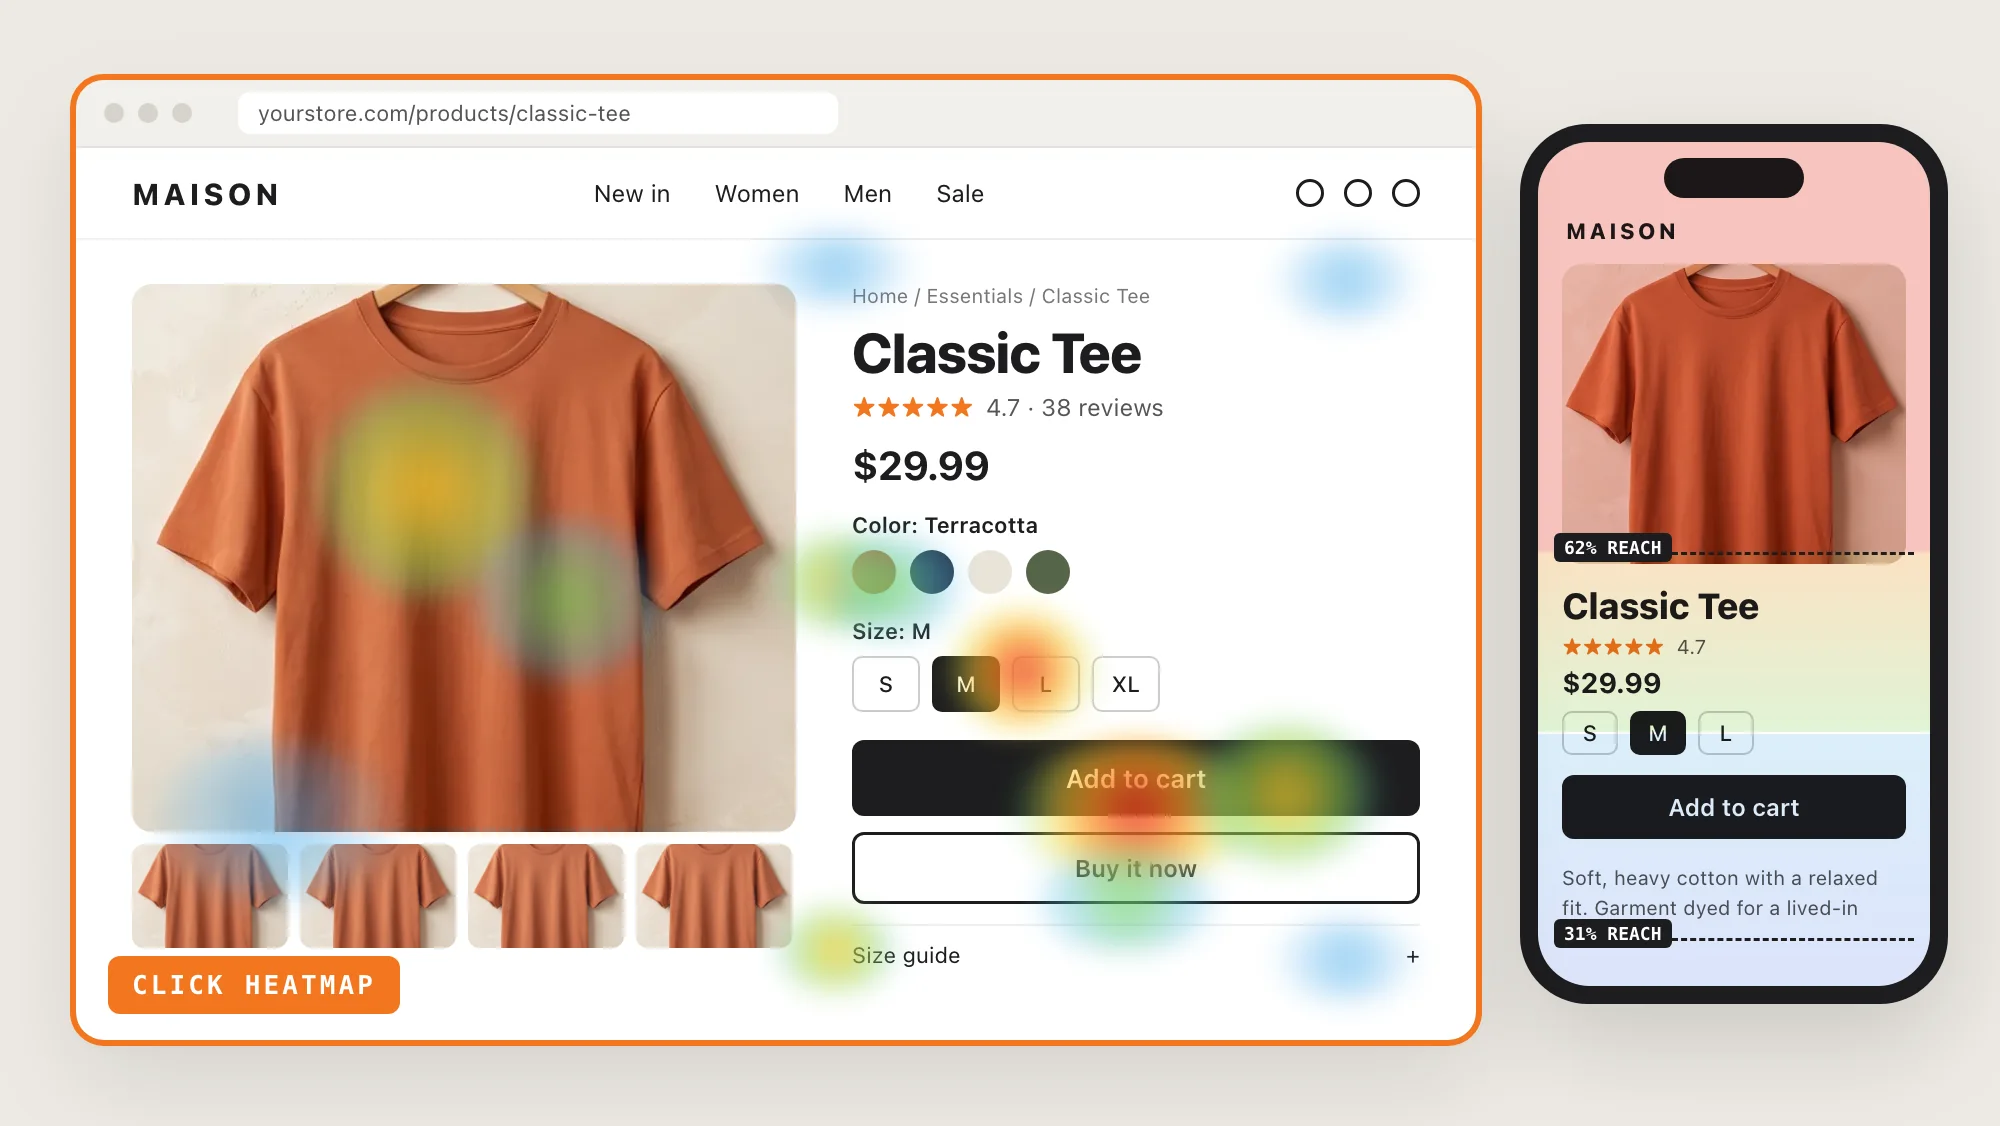
Heatmaps paint that behavior over a real picture of the page, so you can see at a glance whether shoppers reach the Add to cart button or stop above it.
Here are the three ways to add heatmaps to a Shopify store: with a Visitor Recordings app, from your theme settings, or with custom code.
What Are Heatmaps?
Heatmaps are colored overlays on a picture of one page that show what all your visitors did there, from few (cool colors) to many (warm colors). A visitor recording shows you one shopper's visit, while a Shopify heatmap adds up every recorded visit to that page.
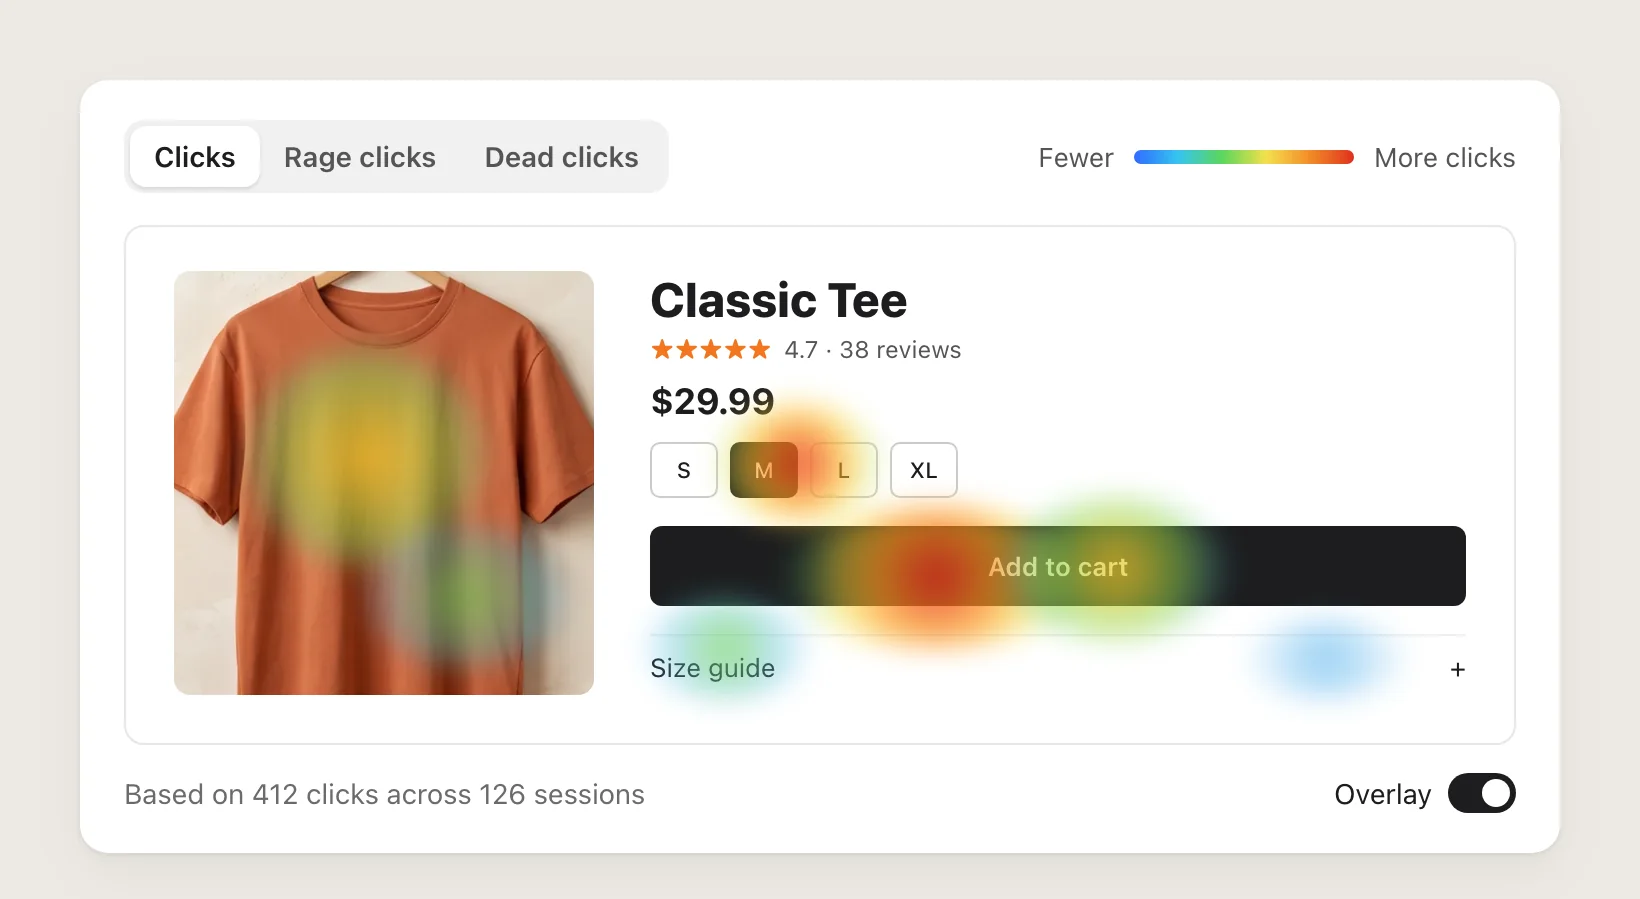
A good Shopify heatmap includes:
- Click maps: The click map shows where visitors click, with rage clicks and dead clicks marked.
- Scroll maps: The scroll map shows how far down the page shoppers reach.
- Attention maps: The attention map shows where visitors linger.
- Revenue maps: The revenue map shows the clicks on the path to purchase.
The best heatmaps link back to the visitor recordings behind them, so you can watch the visits that made the colors.
What's the Quickest Way to Add Heatmaps?
- Vitals - All in One App is the quickest way to add heatmaps for most stores
- Vitals also offers 40+ apps, such as Sticky Add to Cart, Pop-ups and Currency Converter, in one subscription from $29.99/month, so you don't have to install and pay for each app separately
Here's how the three methods compare. If you want to weigh several recording apps against each other, see our list of the best session replay apps for Shopify.
How to Add Heatmaps With a Visitor Recordings App?
Install the Vitals - All in One App, open its Visitor Recordings app and click Activate app. Visitor Recordings then starts recording visits to your store, and the steps below turn those recordings into a heatmap of any page, with no extra setup and no tracking code.
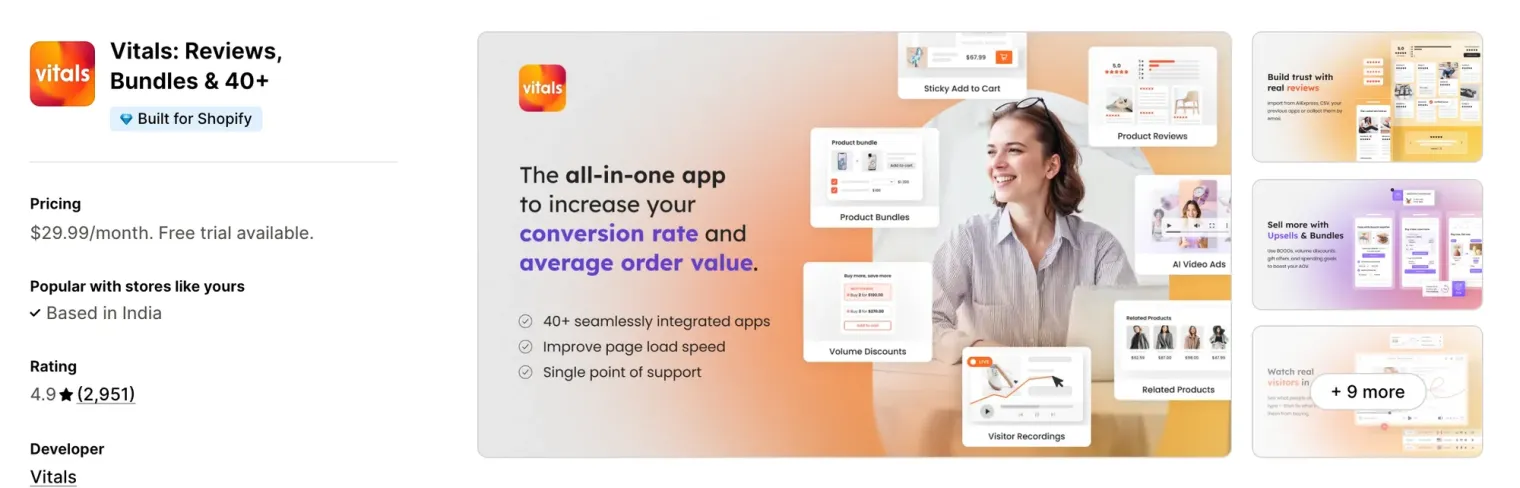
Step 1: Install the Vitals - All in One App
Install the Vitals - All in One App from the Shopify App Store. The 7-day free trial includes the Vitals Visitor Recordings app and its heatmaps.
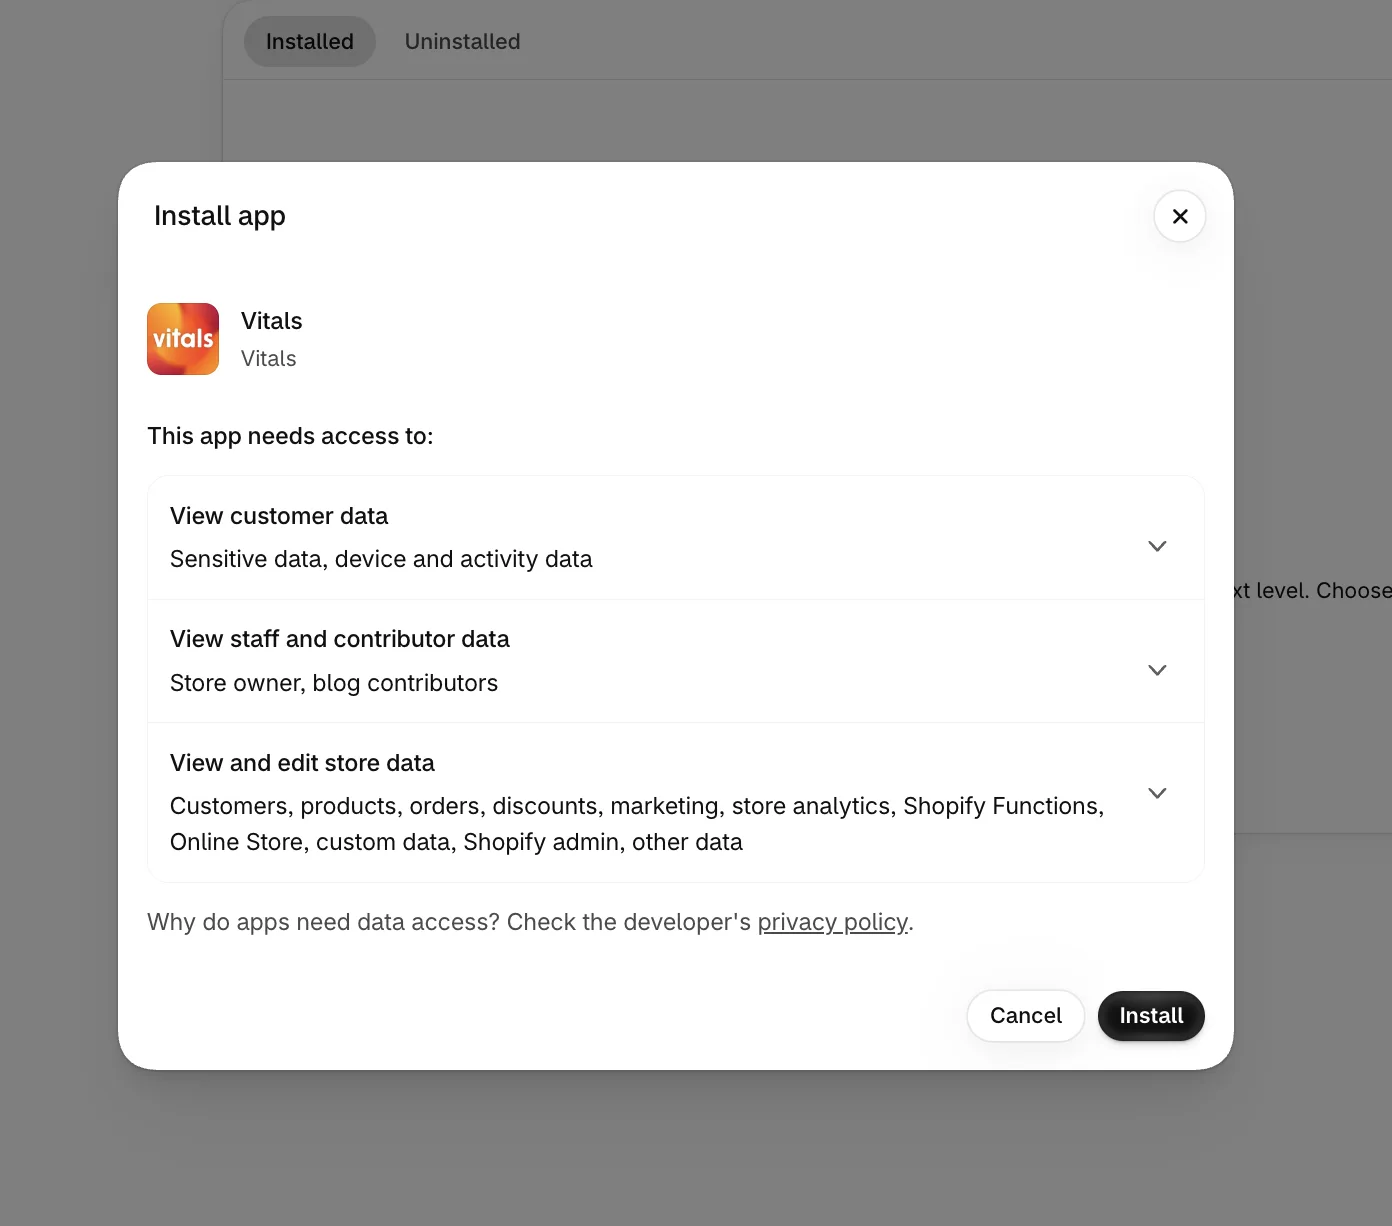
Step 2: Approve the Install in Shopify
Shopify shows which store data Vitals can use. Click Install, and the Vitals dashboard opens in your Shopify admin.
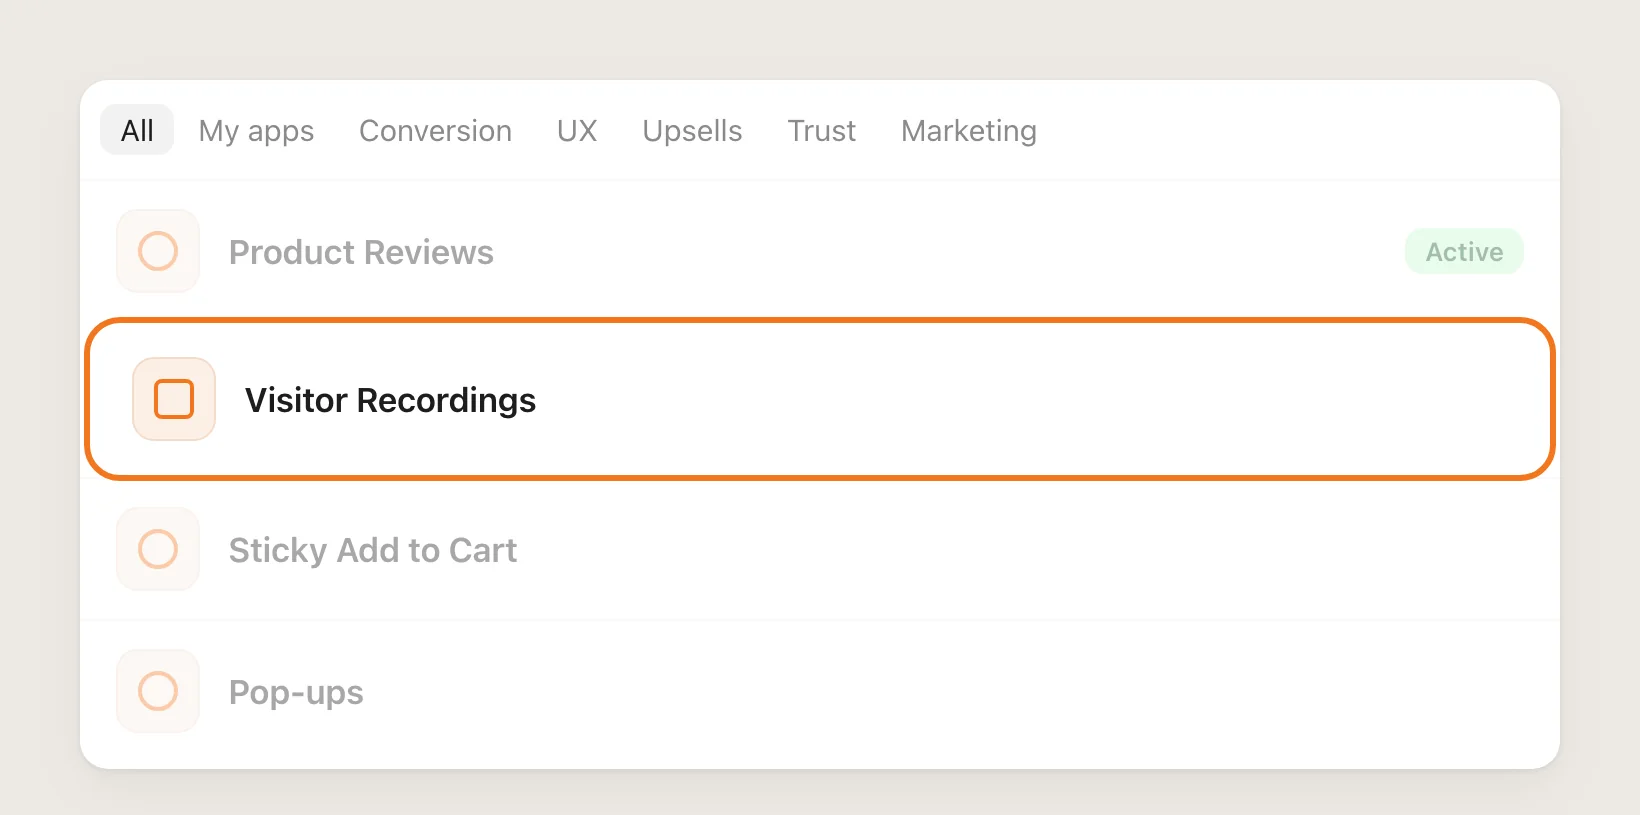
Step 3: Open Visitor Recordings
In the Vitals dashboard, find Visitor Recordings in the list of apps and click it.
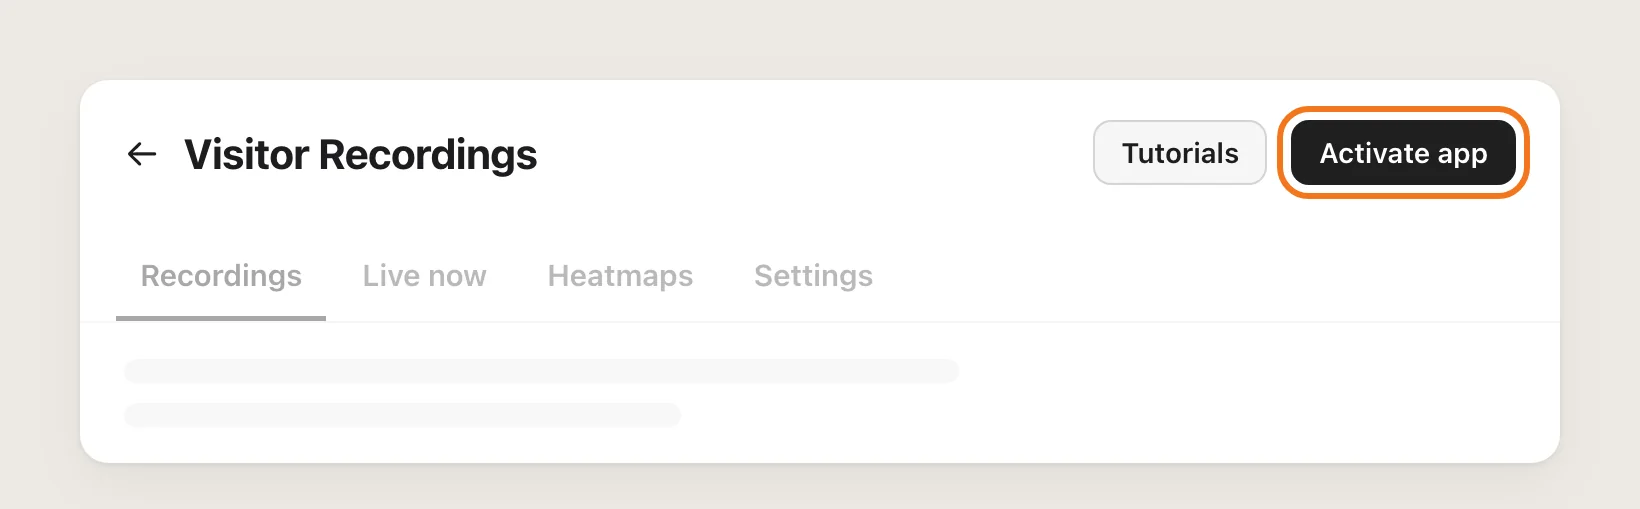
Step 4: Activate the App
Click Activate app at the top right of the Visitor Recordings page. Recordings of real visits then start showing up in the app, and heatmaps are built from those recordings.
A page needs at least 25 recorded sessions before a heatmap draws, counted separately for desktop and mobile.
Step 5: Open the Heatmaps Tab
Choose the Heatmaps tab, next to Recordings, Live now and Settings. The Create a heatmap for one of your busiest pages card shows your five most-viewed pages from the last 30 days, with a Desktop and a Mobile recordings count for each one.
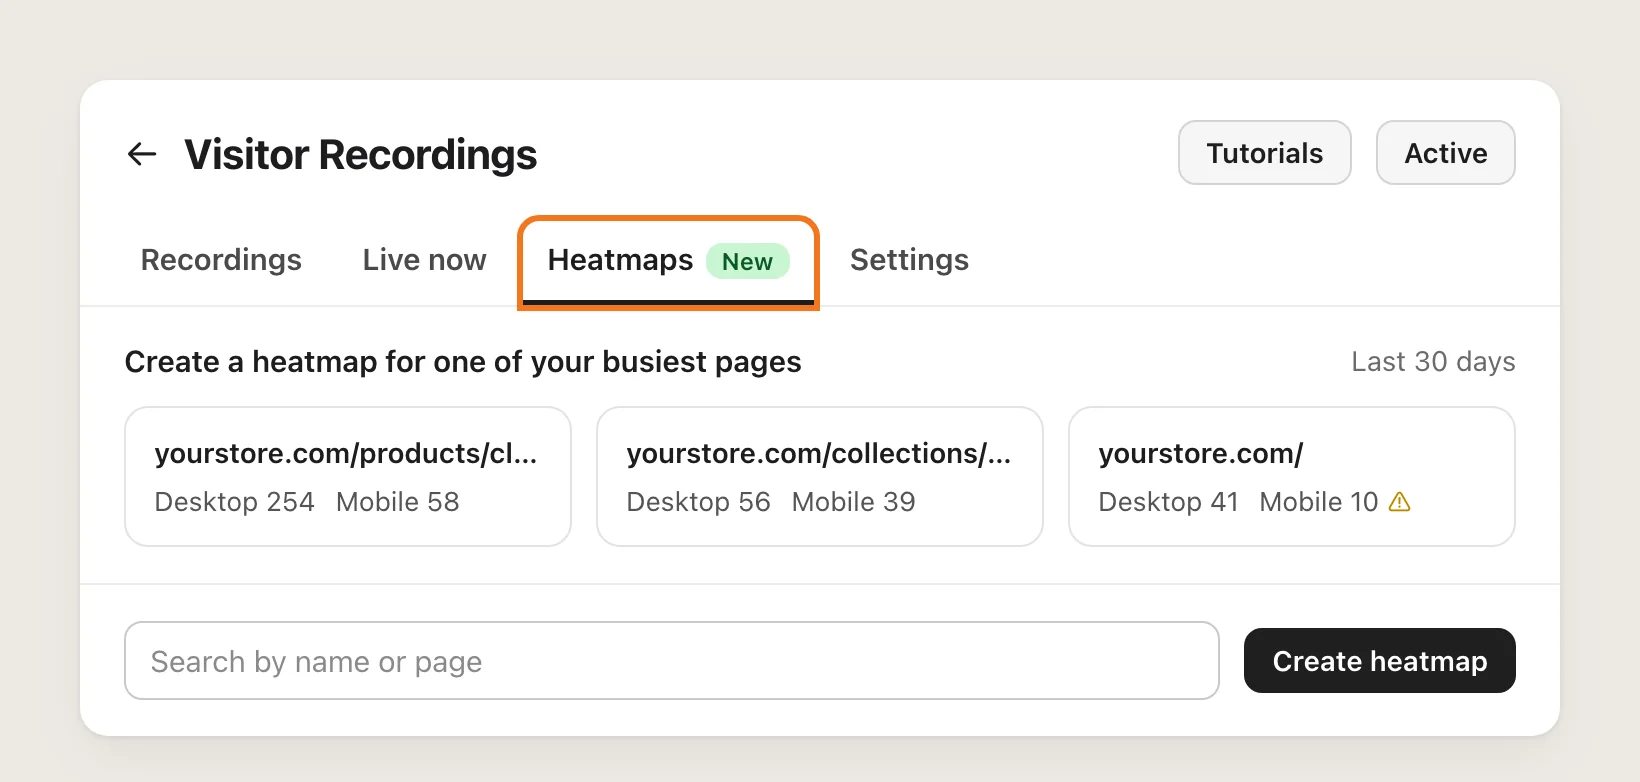
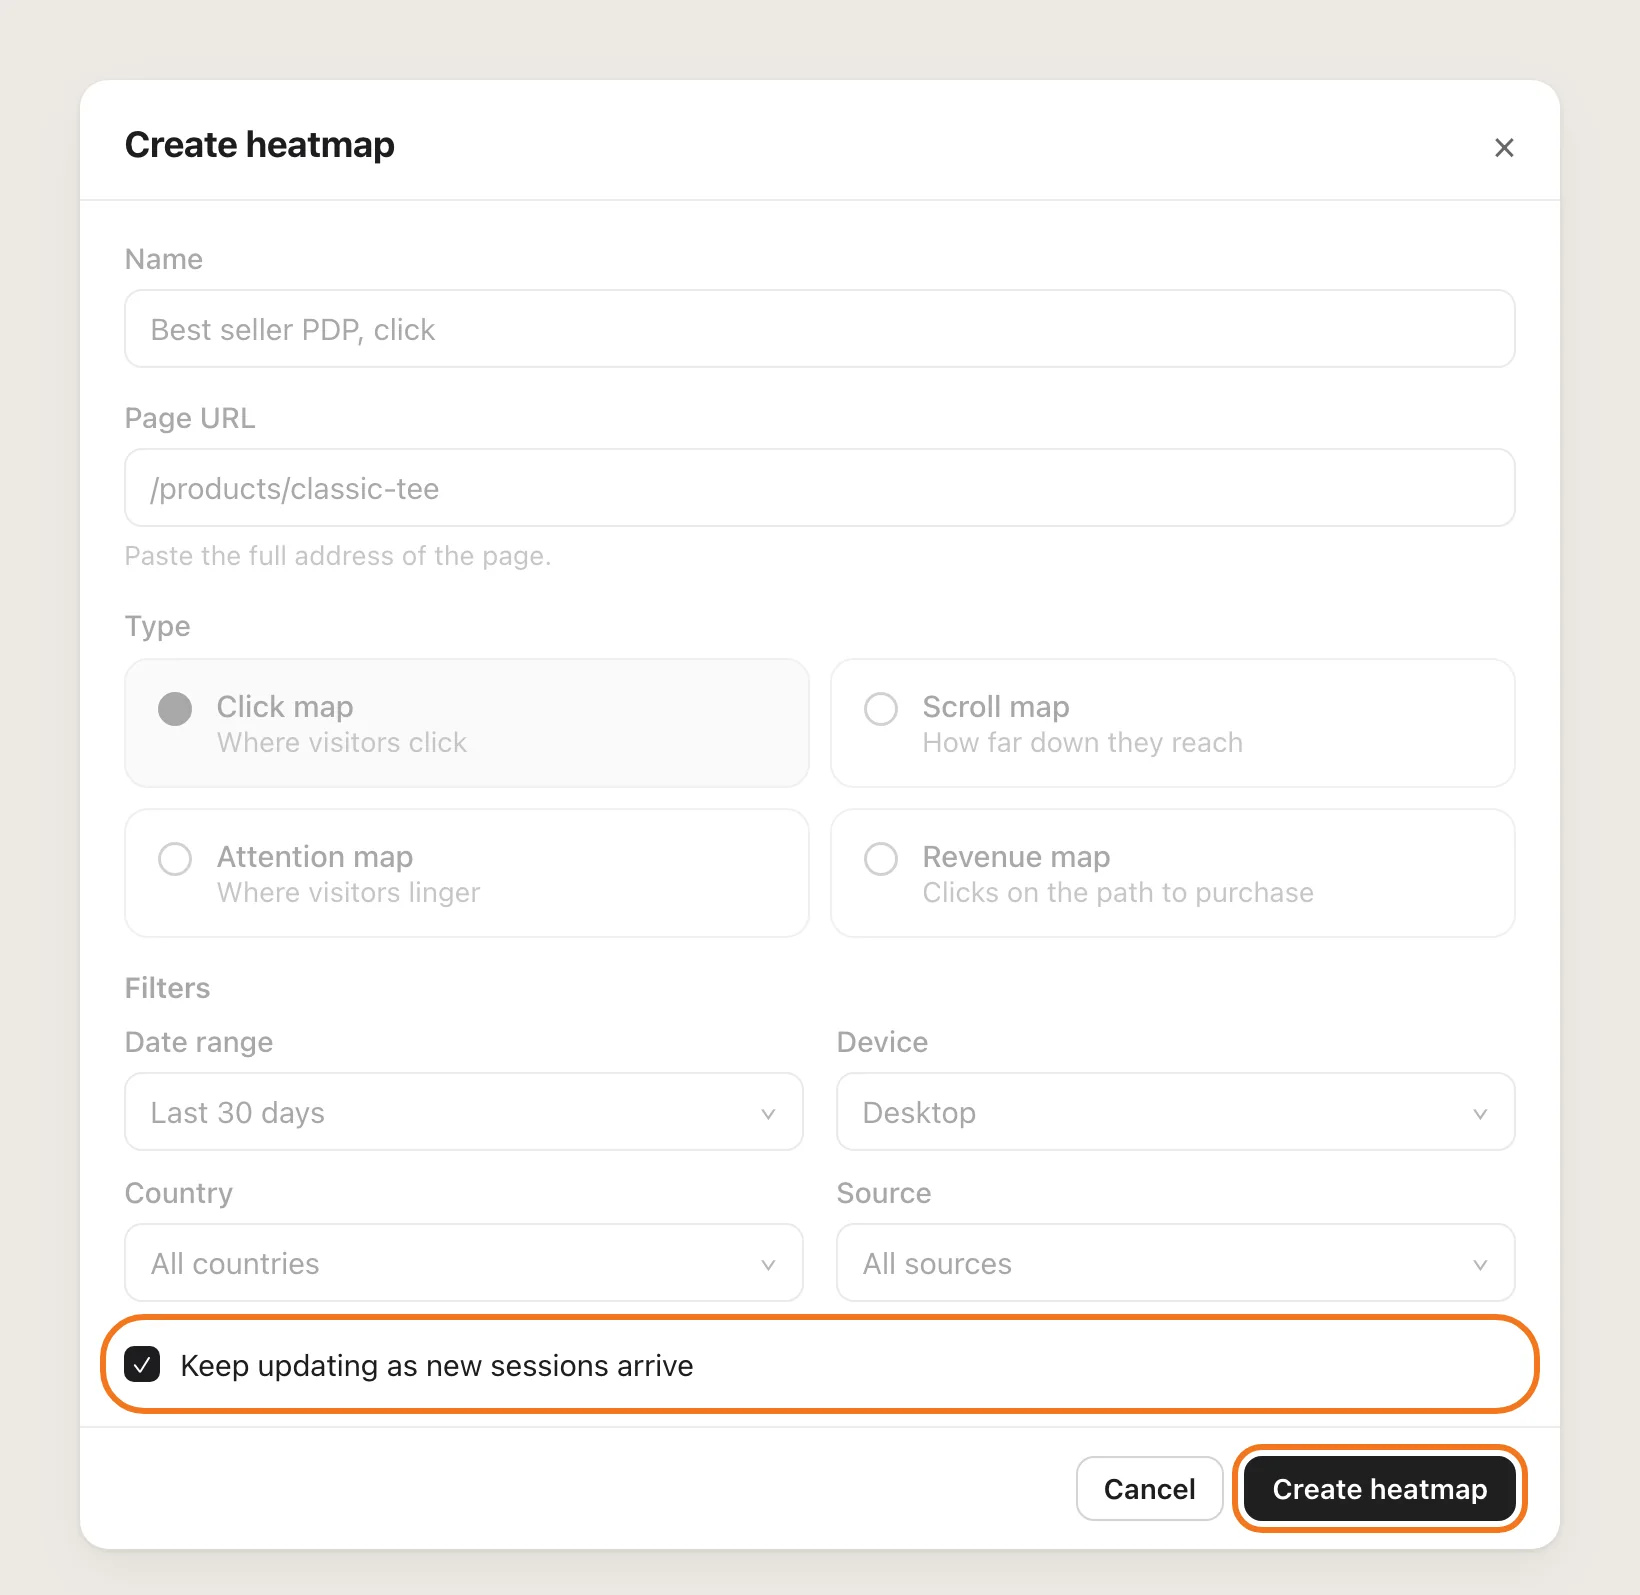
Click a page card to open the create form with that page filled in, or click Create heatmap above your saved list. A warning icon on a card means that page doesn't have enough recordings yet for that device.
Step 6: Name the Heatmap and Set the Page
Give the heatmap a Name you will recognize later, such as "Best seller PDP, click". Each name has to be different from your other heatmaps.
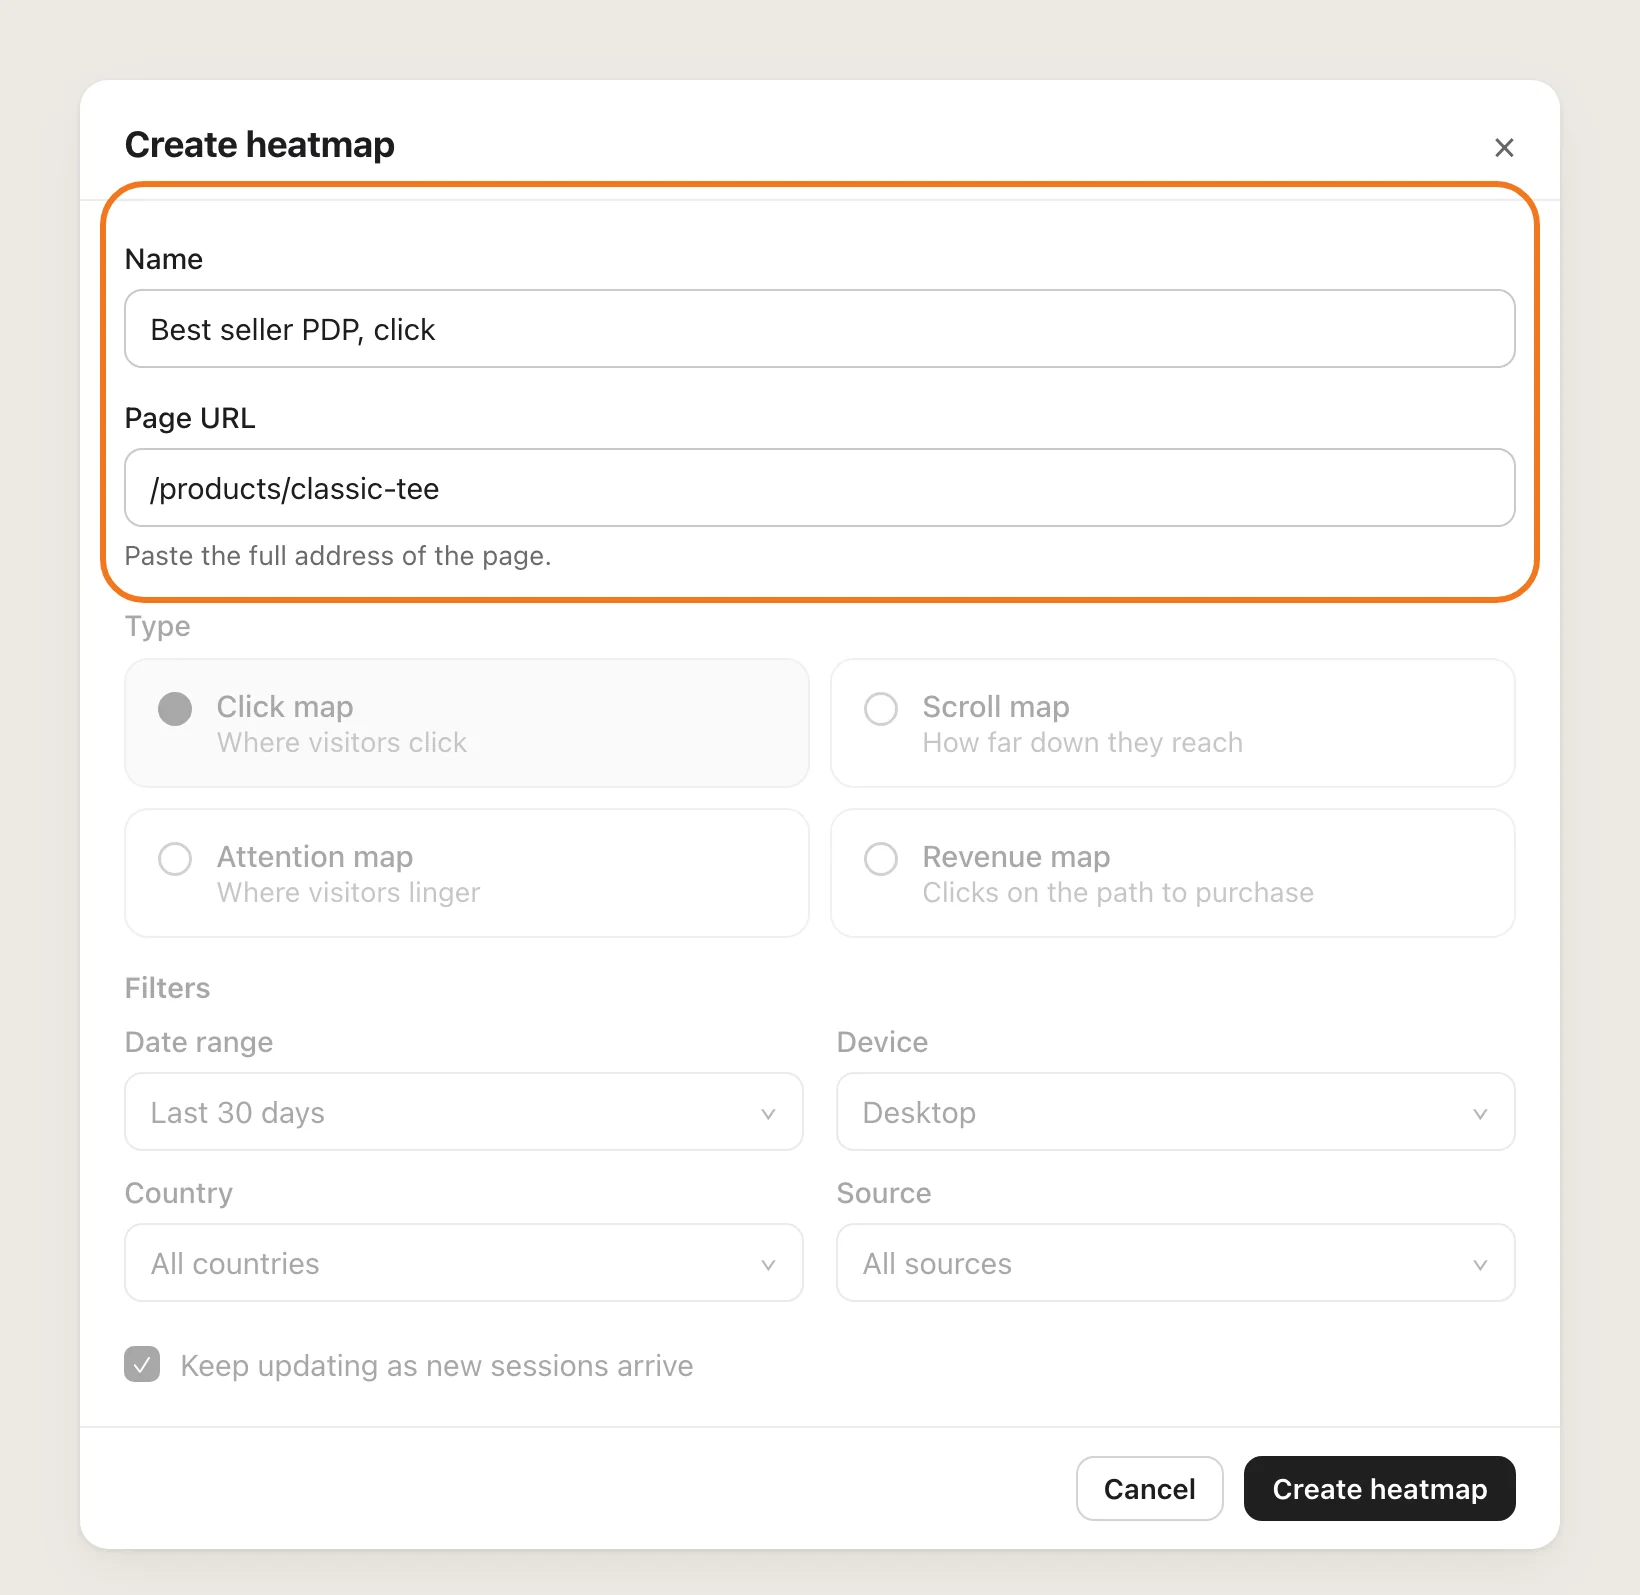
In Page URL, paste the page address, such as yourstore.com/products/best-seller, or just its path, such as /products/best-seller. The page must be on your own store.
Step 7: Pick the Heatmap Type
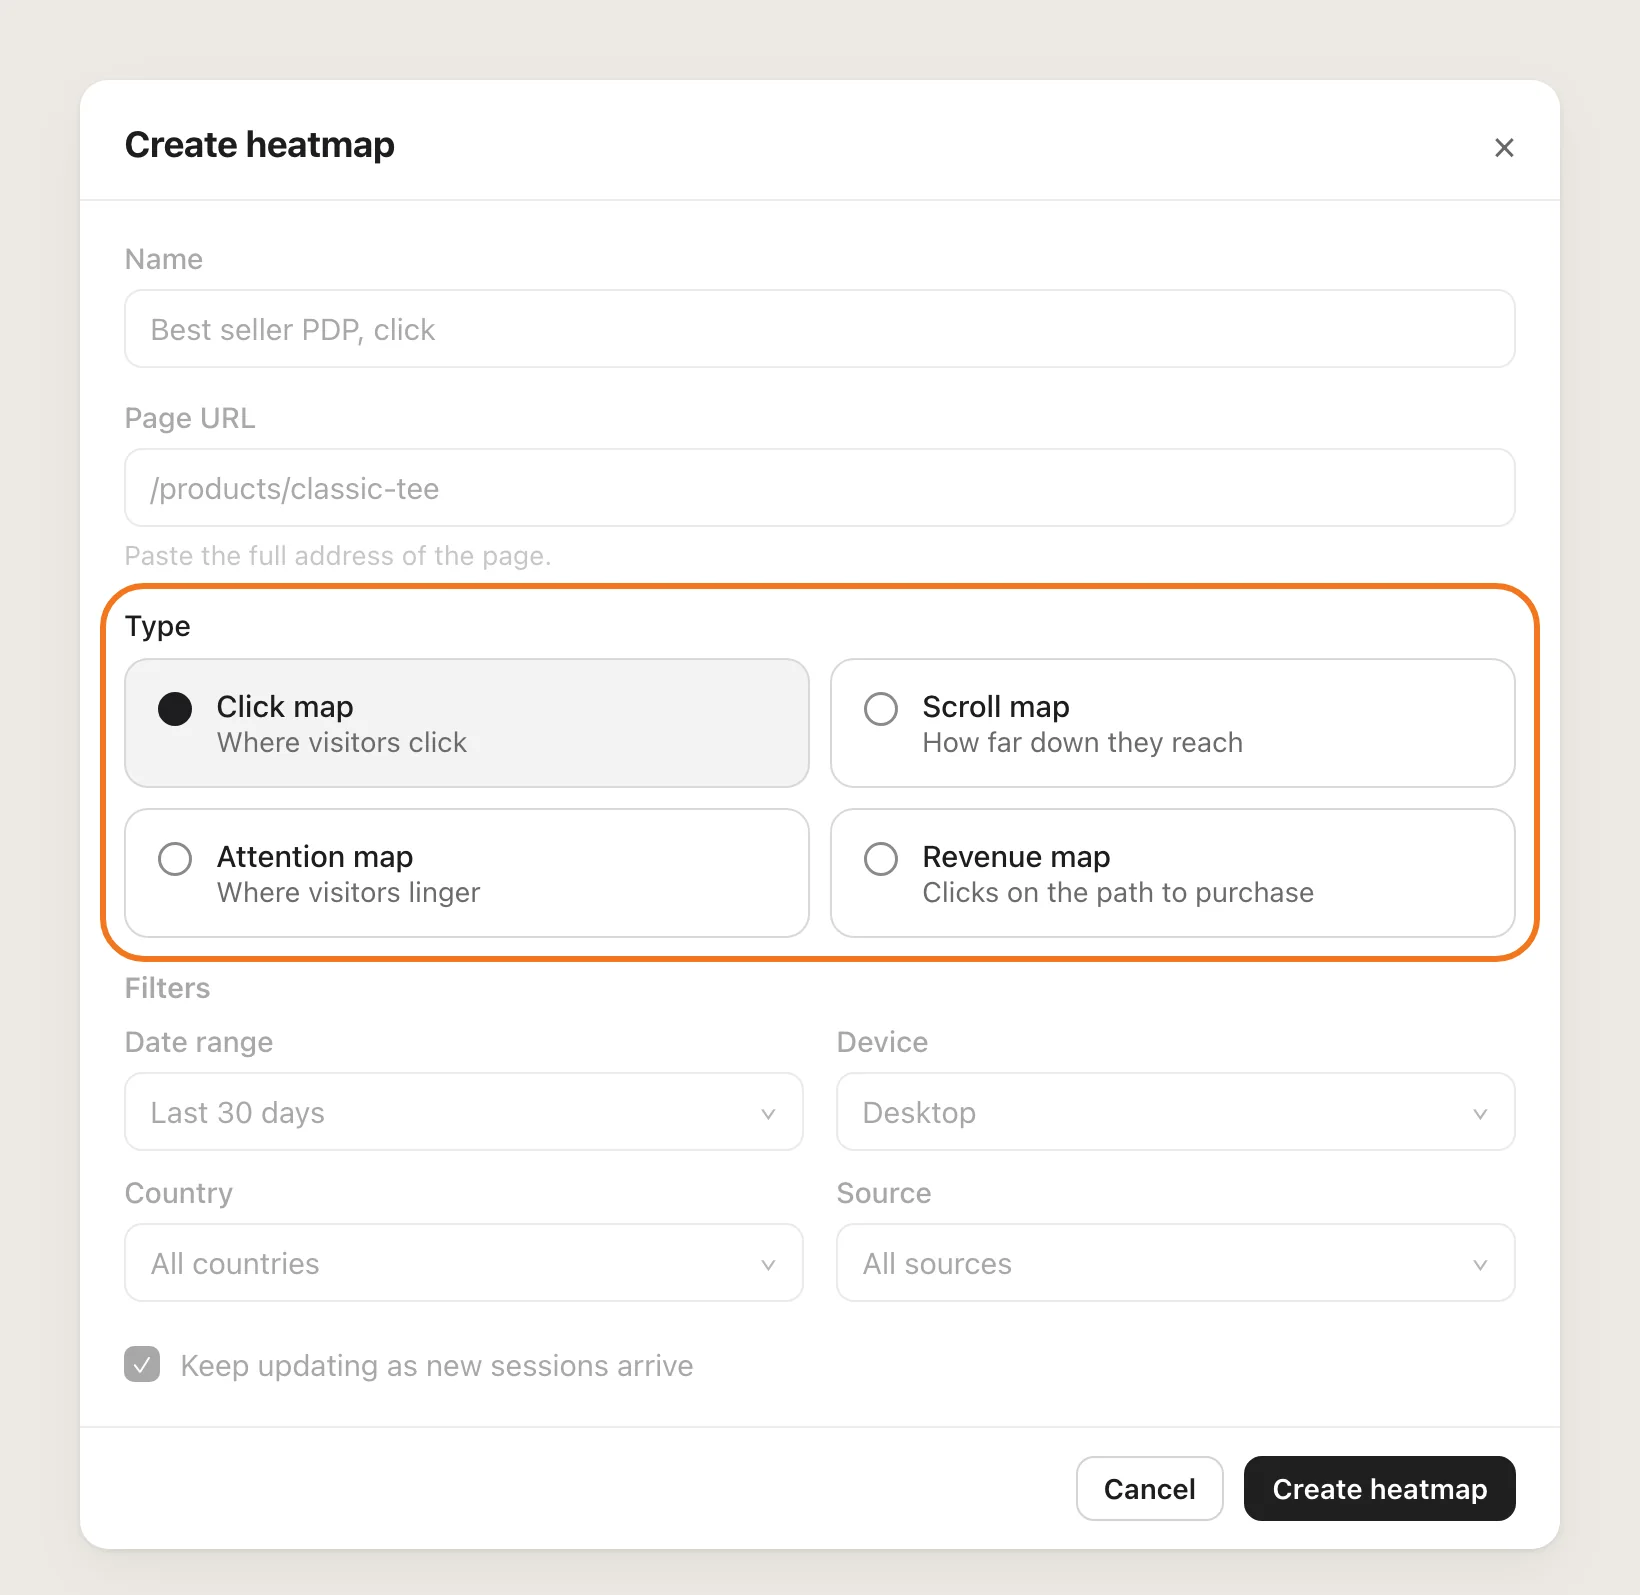
Under Type, choose one of the four Shopify heatmaps:
- Click map: Where visitors click
- Scroll map: How far down they reach
- Attention map: Where visitors linger. It uses desktop sessions only
- Revenue map: Clicks on the path to purchase
Step 8: Set the Filters
Set the four Filters: Date range (up to the last 30 days), Device, Country and Source. Device stays on Desktop unless you switch it to Mobile, and there is no all-devices option, so create one heatmap per device.
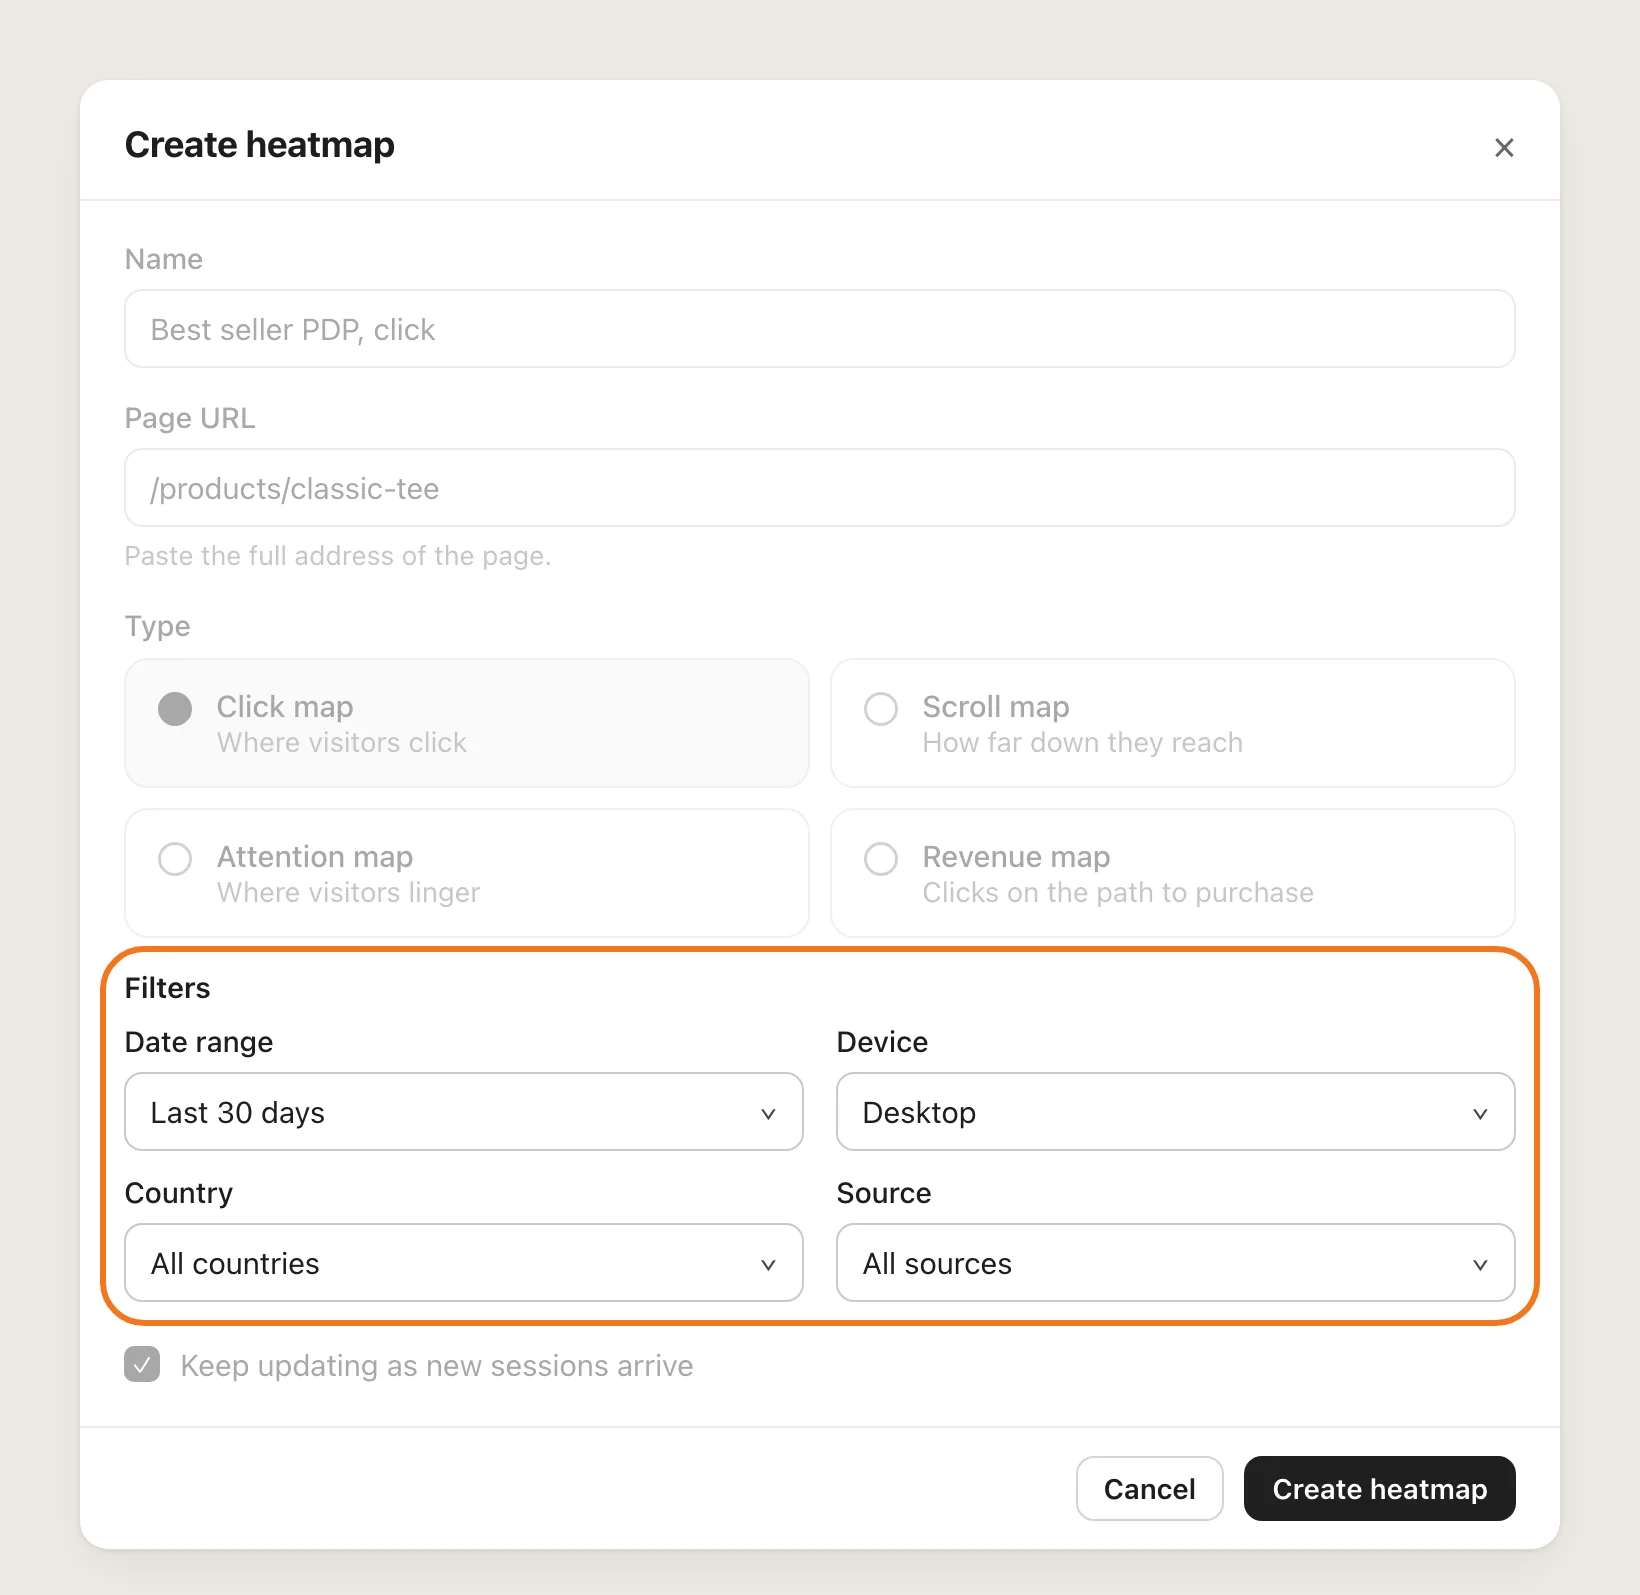
Check the filters before you go on. Once a heatmap exists, the only thing you can change is its name.
Step 9: Choose a Live Heatmap or a Snapshot, Then Create It
Keep updating as new sessions arrive is on by default, so the heatmap keeps adding new traffic. Turn it off to freeze the heatmap as a snapshot of the sessions collected so far, then click Create heatmap.
Step 10: Read the Heatmap and Watch the Recordings
Open the saved heatmap to see the page as visitors saw it, with the heat drawn over the top. On a click map, switch between Clicks, Rage clicks and Dead clicks.
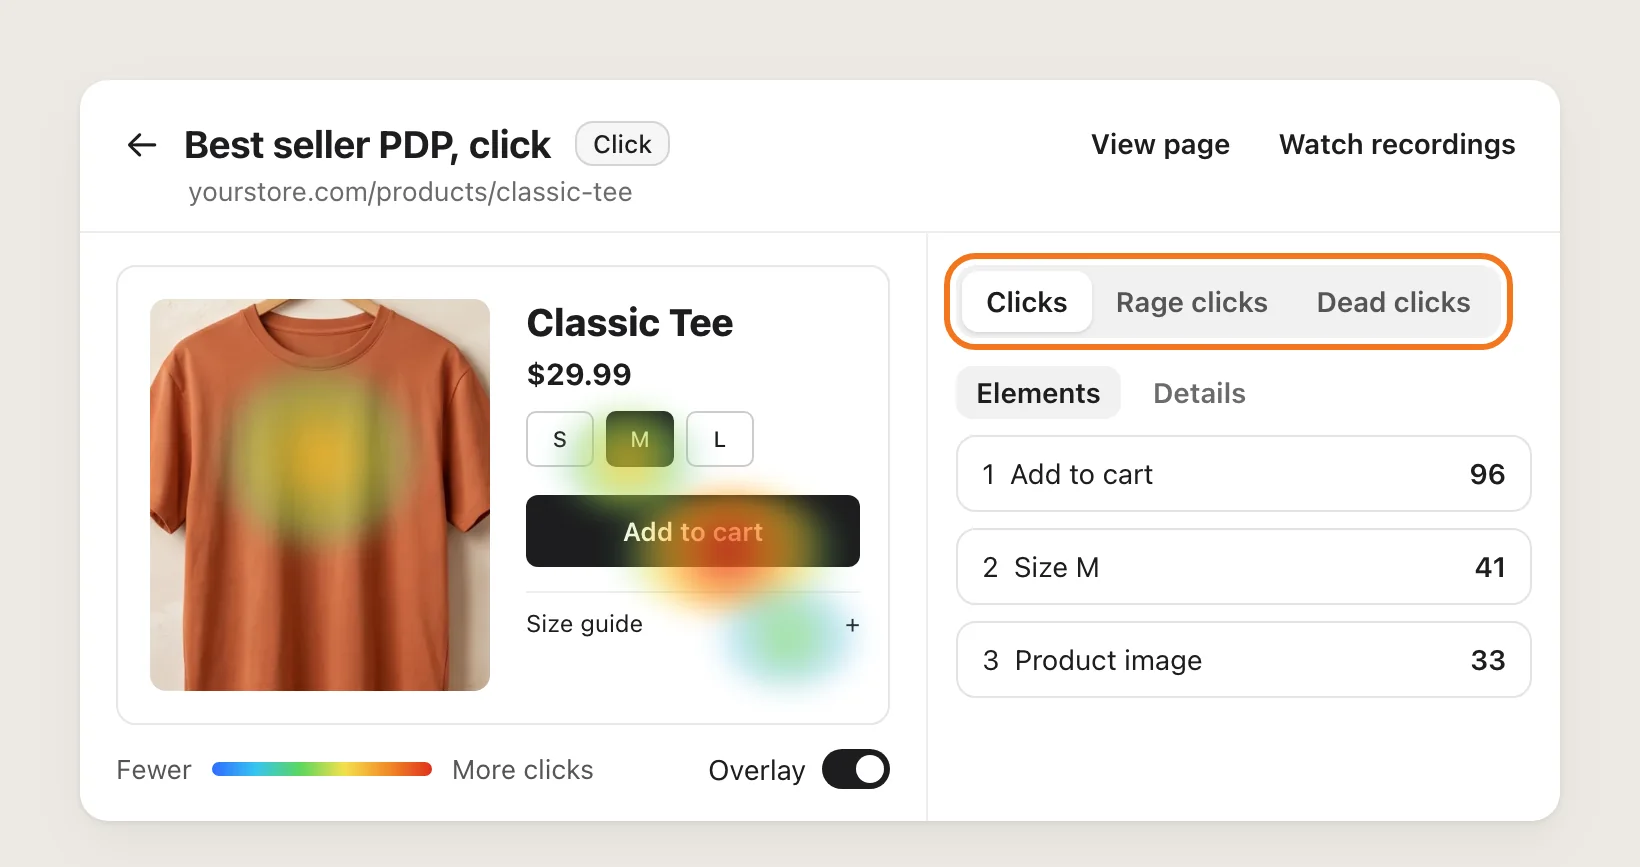
The Overlay switch turns the heat on and off, and the panel beside the page lists the clicked Elements and the Details of the heatmap. Click Watch recordings to see the visits behind the heatmap.
Step 11: Voila, Your Heatmaps Are Live on the Store
You now see where shoppers click, how far they scroll and where they linger, on any page of your store.
How to Add Heatmaps From Your Theme Settings?
Shopify themes don't include heatmaps, so there is no theme setting to turn on. To see a Shopify heatmap, use a heatmap app or custom code.
How to Add Heatmaps Without an App?
Hire a developer to build click and scroll tracking into your theme, plus a server that stores the data and draws it over your pages.
A custom Shopify heatmap usually involves:
- Duplicating your theme to test the code safely
- Adding a script that records clicks, taps and scroll depth on every page
- Storing those events on a server outside Shopify
- Capturing each page so the heat has a picture to sit on
- Drawing the heatmap for desktop and mobile separately
- Leaving out bots, your own visits and anything shoppers type in a field
Custom code means no app, but you or your developer have to host, update and pay for the tracking. Every new script on the storefront also adds to page load, and a theme update can remove the code.
How to Increase Sales With Heatmaps?
Heatmaps increase sales by showing you the exact spot on a page where shoppers stop, so you fix that spot first. These settings point you to it:
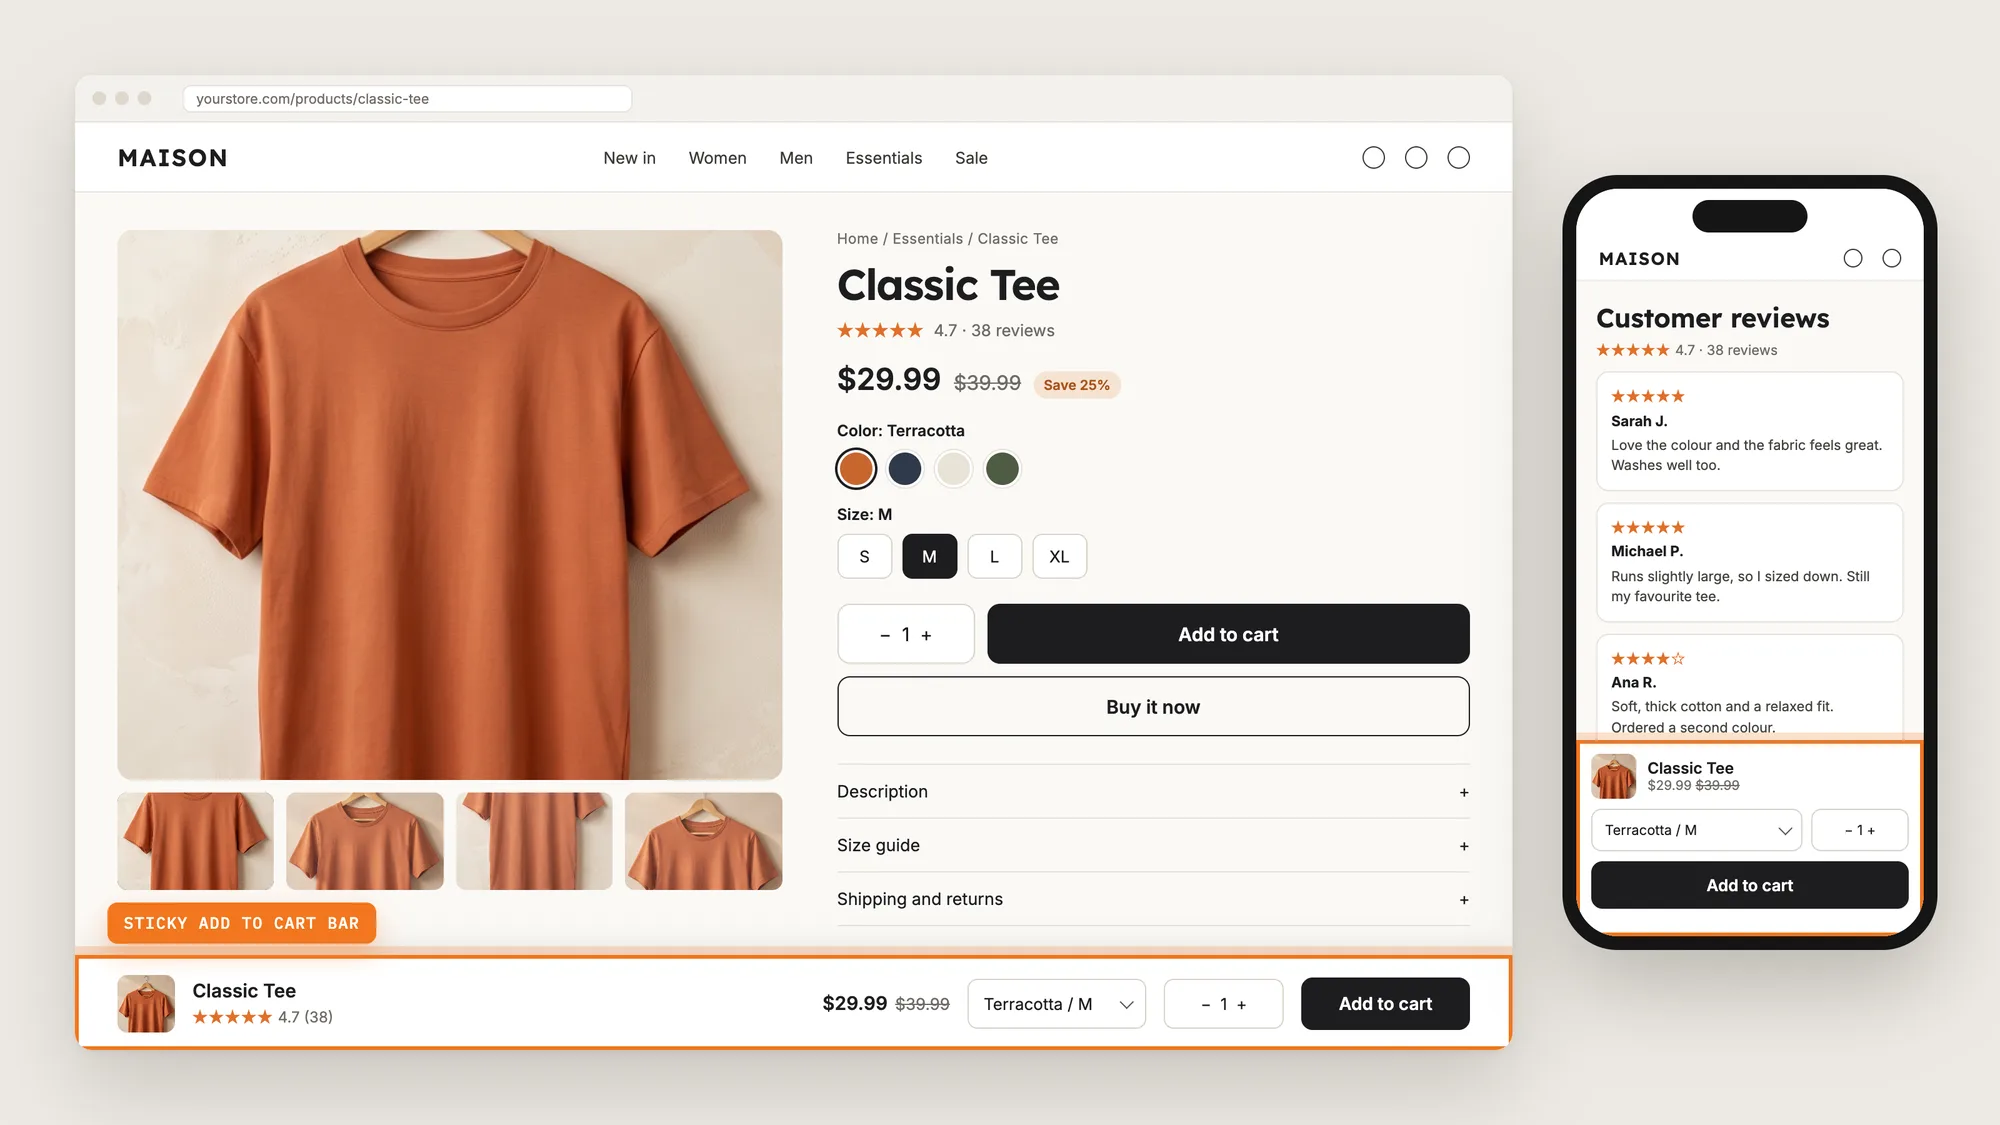
- Check whether shoppers reach Add to cart. Create a scroll map of your best-selling product page. If most shoppers never reach the button, move it up or keep it on screen with a sticky add to cart button
- Fix what shoppers rage click. Switch a click map to Rage clicks to find the spots shoppers click again and again because nothing happens
- Make dead clicks work. Switch to Dead clicks to find images or text that look like buttons, then link them or restyle them
- Learn from buyers. A revenue map shows how often shoppers who clicked an element went on to add to cart or order, so you see what buyers look at before they buy
- Compare your paid traffic. Use the Source filter to make one heatmap for your ad traffic and one for all visitors, then compare where each group stops
- Check your phone layout. Create the same heatmap with Device set to Mobile, since shoppers on phones see a different page
- Test a change before and after. Freeze a heatmap before you change a page, then create a second frozen heatmap with a Date range that starts the day after the change
Why Isn't My Heatmap Showing or Working?
Check these first when a Shopify heatmap doesn't draw:
- The heatmap says it needs more sessions: A page needs at least 25 recorded sessions per device. Leave a live heatmap in place and it fills in as traffic comes through, or create a new snapshot once the page has more traffic
- A page has enough desktop recordings but not mobile: The 25-session minimum is counted per device, so a page can be ready for a desktop heatmap and not a mobile one
- The attention map is empty but the click map works: Attention maps use desktop sessions only, and 10 of the page's desktop sessions have to produce a usable measurement before the heat is drawn
- Most elements on the revenue map are blank: An element needs 30 attributed sessions of its own before it shows a rate, so a quieter page fills in slowly
- You can't change the page or the filters: Only the name can change after you create a heatmap. Create a second heatmap with the settings you want and delete the first
- The scroll map looks shorter than the page: The bottom of a scroll map is the furthest any visitor reached, not the true bottom of the page
- You can't create another heatmap: You can save up to 25 heatmaps per store. Delete one you no longer need from its row in the saved list
- Two versions of a page show up in one heatmap: Heatmaps can't be split by A/B test variant, so versions that share a URL at the same time are combined
Which Heatmap Method Should You Choose?
Vitals - All in One App suits most stores, because the heatmaps come from recordings it already collects.
- Choose Vitals - All in One App if you want click, scroll, attention and revenue heatmaps with no code and no extra tracking script. It also includes 40+ other apps in one subscription from $29.99/month, so you don't have to install and pay for each app separately
- Choose your theme's setting if your theme ever adds heatmaps; today Shopify themes don't include them
- Choose custom code if you have a developer and want to host and maintain your own tracking
If you already use another recording app, see our MIDA Replay alternatives and ReplayPRO alternatives.
Frequently Asked Questions
1. What is the best way to add heatmaps to a Shopify store?
Vitals - All in One App is the best way for most stores. Its Visitor Recordings app builds click, scroll, attention and revenue heatmaps from the visits it records, with no extra setup and no tracking code.
2. Do Shopify themes include heatmaps?
No. Shopify themes don't include heatmaps, so you need a heatmap app or custom code to see where shoppers click and scroll.
3. Do I need to add tracking code for heatmaps?
No. Vitals heatmaps read the recordings the Visitor Recordings app already captures, so there is nothing to switch on and no code to add.
4. Do heatmaps slow down my store?
No. Vitals draws heatmaps in your Vitals dashboard from data that is already collected. Nothing extra loads on your storefront, and shoppers see no difference.
5. How many visits does a page need for a heatmap?
At least 25 recorded sessions per device. Attention maps also need 10 desktop sessions with a usable measurement, and each element on a revenue map needs 30 attributed sessions of its own.
6. Can I see heatmaps for mobile visitors?
Yes. Set Device to Mobile when you create a click, scroll or revenue heatmap. Attention maps use desktop sessions only.
7. How far back does a Shopify heatmap go?
Up to 30 days. Recordings are kept for 31 days, and you can choose a shorter Date range when you create the heatmap.